重绘之 drawRect
引言:
drawRect是 UIView 类的一个方法,在 drawRect 中所调用的重绘功能是基于 Quartz 2D 实现的,Quartz 2D 是一个二维图形绘制引擎,支持 iOS 环境和 Mac OS X环境。利用 UIKit 框架提供的控件,我们能实现一些简单的 UI 界面,但是,有些 UI 界面比较复杂,用普通的 UI 控件无法实现,或者实现效果不佳,这时可以利用 Quartz 2D 技术将控件内部的结构画出来,自定义所需控件,这也是 Quartz 2D 框架在 iOS 开发中一个很重要的价值。
iOS 的绘图操作是在 UIView 类的 drawRect 方法中进行的,我们可以重写一个 view 的 drawRect 方法,在其中进行绘图操作,在首次显示该 view 时程序会自动调用此方法进行绘图。 在多次手动重复绘制的情况下,需要调用 UIView 中的 setNeedsDisplay 方法,则程序会自动调用 drawRect 方法进行重绘。
# 一. drawRect使用过程
在view的drawRect方法中,利用Quartz 2D 提供的API绘制图形的步骤:
- 新建一个view,继承自UIView,并重写drawRect方法;
- 在drawRect方法中,获取图形上下文;
- 绘图操作;
- 渲染。
# 二. CGContext
Quartz 2D是 CoreGraphics 框架的一部分,因此其中的相关类及方法都是以 CG 为前缀,在 drawRect 重绘过程中最常用的就是CGContext类。CGContext 又叫图形上下文,相当于一块画板,以堆栈形式存放,只有在当前 context 上绘图才有效。iOS 又分多种图形上下文,其中 UIView 自带提供的在 drawRect 方法中通过 UIGraphicsGetCurrentContext获取,还有专门为图片处理的 context ,还有 pdf 的 context 等等均有特定的获取方法,本文只对第一种做相关介绍。
CGContext 类中的常用方法:
// 获取当前上下文
    CGContextRef context = UIGraphicsGetCurrentContext();

    CGContextMoveToPoint        // 移动画笔
    CGContextAddLineToPoint     // 在画笔位置与point之间添加将要绘制线段 (在draw时才是真正绘制出来)
    CGContextAddEllipseInRect   // 绘制椭圆
    CGContextFillEllipseInRect
    CGContextSetLineCap         // 设置线条末端形状
    CGContextSetLineDash        // 画虚线
    CGContextAddRect             // 画矩形
    CGContextStrokeRect
    CGContextStrokeRectWithWidth
    CGContextStrokeLineSegments     // 画一些线段
    CGContextAddArc(context, x1, y1, radius, startAngle, endAngle, clockwise);  // 画弧: 以(x1, y1)为圆心radius半径,startAngle和endAngle为弧度
    CGContextAddArcToPoint(context, x1, y1,  x2,  y2, radius);              // 先画两条线从point 到 (x1, y1) , 从(x1, y1) 到(x2, y2) 的线  切里面的圆
    CGContextSetShadowWithColor     // 设置阴影
    CGContextSetRGBFillColor        // 设置填充颜色
    CGContextSetRGBStrokeColor      // 设置画笔颜色
    CGContextSetFillColorSpace      // 设置填充颜色空间
    CGConextSetStrokeColorSpace      // 设置画笔颜色空间
    CGContextFillRect       // 以当前颜色填充rect
    CGContextSetAlaha       // 设置透明度
    CGContextSetLineWidth   // 设置线的宽度
    CGContextAddRects       // 画多个矩形
    CGContextAddQuadCurveToPoint // 画曲线
    CGContextStrokePath     // 开始绘制图片
    CGContextDrawPath        // 设置绘制模式
    CGContextClosePath      // 封闭当前线路
    CGContextTranslateCTM(context, 0, rect.size.height);   CGContextScaleCTM(context, 1.0, -1.0); // 反转画布
    CGImageCreateWithImageInRect        // 从原图片中取小图

    // 画图片
    CGImageRef image=CGImageRetain(img.CGImage);
    CGContextDrawImage(context, CGRectMake(10.0, height - 100.0, 90.0, 90.0), image);

    // 实现渐变颜色填充
    CGContextDrawLinearGradient(context, gradient, CGPointMake(0.0, 0.0) ,CGPointMake(0.0, self.frame.size.height), kCGGradientDrawsBeforeStartLocation);
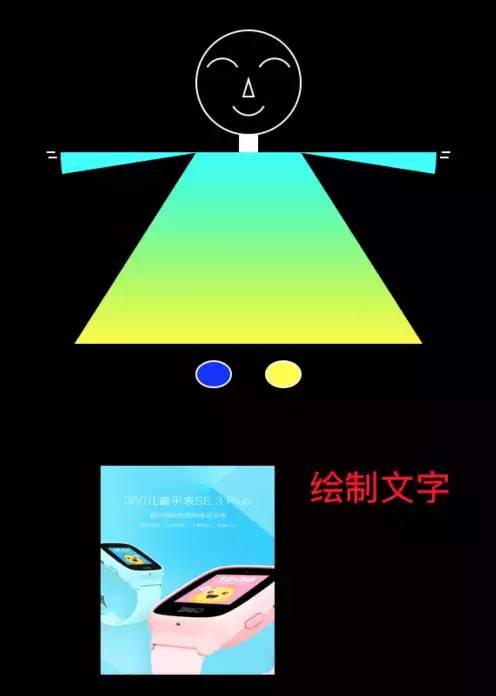
# 三. drawRect方法重绘的实例
我们在drawRect方法中绘制一些图形,如图:
代码如下:
- (void)drawRect:(CGRect)rect {

    //1. 注:如果没有获取context时,是什么都不做的(背景无变化)
    [super drawRect:rect];

    // 获取上下文
    CGContextRef context =UIGraphicsGetCurrentContext();
    CGSize size = rect.size;
    CGFloat offset = 20;

    // 画脑袋
    CGContextSetRGBStrokeColor(context,1,1,1,1.0);
    CGContextSetLineWidth(context, 1.0);
    CGContextAddArc(context, size.width / 2, offset + 30, 30, 0, 2*M_PI, 0);
    CGContextDrawPath(context, kCGPathStroke);

    // 画眼睛和嘴巴
    CGContextMoveToPoint(context, size.width / 2 - 23, 40);
    CGContextAddArcToPoint(context, size.width / 2 - 15, 26, size.width / 2 - 7, 40, 10);
    CGContextStrokePath(context);

    CGContextMoveToPoint(context, size.width / 2 + 7, 40);
    CGContextAddArcToPoint(context, size.width / 2 + 15, 26, size.width / 2 + 23, 40, 10);
    CGContextStrokePath(context);//绘画路径

    CGContextMoveToPoint(context, size.width / 2 - 8, 65);
    CGContextAddArcToPoint(context, size.width / 2, 80, size.width / 2 + 8, 65, 10);
    CGContextStrokePath(context);//绘画路径

    // 画鼻子
    CGPoint nosePoints[3];
    nosePoints[0] = CGPointMake(size.width / 2, 48);
    nosePoints[1] = CGPointMake(size.width / 2 - 3, 58);
    nosePoints[2] = CGPointMake(size.width / 2 + 3, 58);
    CGContextAddLines(context, nosePoints, 3);
    CGContextClosePath(context);
    CGContextDrawPath(context, kCGPathFillStroke);

    // 画脖子
    CGContextSetFillColorWithColor(context, [UIColor whiteColor].CGColor);
    CGContextStrokeRect(context, CGRectMake(size.width / 2 - 5, 80, 10, 10));
    CGContextFillRect(context,CGRectMake(size.width / 2 - 5, 80, 10, 10));

    //    // 画衣裳
    //    CGPoint clothesPoints[4];
    //    clothesPoints[0] = CGPointMake(size.width / 2 - 30, 90);
    //    clothesPoints[1] = CGPointMake(size.width / 2 + 30, 90);
    //    clothesPoints[2] = CGPointMake(size.width / 2 + 100, 200);
    //    clothesPoints[3] = CGPointMake(size.width / 2 - 100, 200);
    //    CGContextAddLines(context, clothesPoints, 4);
    //    CGContextClosePath(context);
    //    CGContextDrawPath(context, kCGPathFillStroke);

    // 衣裳颜色渐变
    CGMutablePathRef path = CGPathCreateMutable();
    CGPathMoveToPoint(path, NULL, size.width / 2 - 30, 90);
    CGPathAddLineToPoint(path, NULL, size.width / 2 + 30, 90);
    CGPathAddLineToPoint(path, NULL, size.width / 2 + 100, 200);
    CGPathAddLineToPoint(path, NULL, size.width / 2 - 100, 200);
    CGPathCloseSubpath(path);
    [self drawLinearGradient:context path:path startColor:[UIColor cyanColor].CGColor endColor:[UIColor yellowColor].CGColor];
    CGPathRelease(path);

    // 画胳膊
    CGContextSetFillColorWithColor(context, [UIColor colorWithRed:0 green:1 blue:1 alpha:1].CGColor);
    CGContextMoveToPoint(context, size.width / 2 - 28, 90);
    CGContextAddArc(context, size.width / 2 - 28, 90, 80,  - M_PI, -1.05 * M_PI, 1);
    CGContextClosePath(context);
    CGContextDrawPath(context, kCGPathFill);
    CGContextMoveToPoint(context, size.width / 2 + 28, 90);
    CGContextAddArc(context, size.width / 2 + 28, 90, 80,  0, 0.05 * M_PI, 0);
    CGContextClosePath(context);
    CGContextDrawPath(context, kCGPathFill);

    // 画左手
    CGPoint aPoints[2];
    aPoints[0] =CGPointMake(size.width / 2 - 30 - 81, 90);
    aPoints[1] =CGPointMake(size.width / 2 - 30 - 86, 90);
    CGContextAddLines(context, aPoints, 2);
    aPoints[0] =CGPointMake(size.width / 2 - 30 - 80, 93);
    aPoints[1] =CGPointMake(size.width / 2 - 30 - 85, 93);
    CGContextAddLines(context, aPoints, 2);
    CGContextDrawPath(context, kCGPathStroke);
    // 画右手
    aPoints[0] =CGPointMake(size.width / 2 + 30 + 81, 90);
    aPoints[1] =CGPointMake(size.width / 2 + 30 + 86, 90);
    CGContextAddLines(context, aPoints, 2);
    aPoints[0] =CGPointMake(size.width / 2 + 30 + 80, 93);
    aPoints[1] =CGPointMake(size.width / 2 + 30 + 85, 93);
    CGContextAddLines(context, aPoints, 2);
    CGContextDrawPath(context, kCGPathStroke);

    //    // 画虚线
    //    aPoints[0] =CGPointMake(size.width / 2 + 30 + 81, 90);
    //    aPoints[1] =CGPointMake(size.width / 2 + 30 + 86, 90);
    //    CGContextAddLines(context, aPoints, 2);
    //    aPoints[0] =CGPointMake(size.width / 2 + 30 + 80, 93);
    //    aPoints[1] =CGPointMake(size.width / 2 + 30 + 85, 93);
    //    CGContextAddLines(context, aPoints, 2);
    //    CGFloat arr[] = {1, 1};
    //    CGContextSetLineDash(context, 0, arr, 2);
    //    CGContextDrawPath(context, kCGPathStroke);

    // 画双脚
    CGContextSetFillColorWithColor(context, [UIColor blueColor].CGColor);
    CGContextAddEllipseInRect(context, CGRectMake(size.width / 2 - 30, 210, 20, 15));
    CGContextDrawPath(context, kCGPathFillStroke);
    CGContextSetFillColorWithColor(context, [UIColor yellowColor].CGColor);
    CGContextAddEllipseInRect(context, CGRectMake(size.width / 2 + 10, 210, 20, 15));
    CGContextDrawPath(context, kCGPathFillStroke);

    // 绘制图片
    UIImage *image = [UIImage imageNamed:@"img_watch"];
    [image drawInRect:CGRectMake(60, 270, 100, 120)];
    //[image drawAtPoint:CGPointMake(100, 340)];
    //CGContextDrawImage(context, CGRectMake(100, 340, 20, 20), image.CGImage);

    // 绘制文字
    UIFont *font = [UIFont boldSystemFontOfSize:20.0];
    NSDictionary *attriDict = @{NSFontAttributeName:font, NSForegroundColorAttributeName:[UIColor redColor]};
    [@"绘制文字" drawInRect:CGRectMake(180, 270, 150, 30) withAttributes:attriDict];
}

- (void)drawLinearGradient:(CGContextRef)context
                      path:(CGPathRef)path
                startColor:(CGColorRef)startColor
                  endColor:(CGColorRef)endColor {

    CGColorSpaceRef colorSpace = CGColorSpaceCreateDeviceRGB();
    CGFloat locations[] = { 0.0, 1.0 };
    NSArray *colors = @[(__bridge id) startColor, (__bridge id) endColor];
    CGGradientRef gradient = CGGradientCreateWithColors(colorSpace, (__bridge CFArrayRef) colors, locations);
    CGRect pathRect = CGPathGetBoundingBox(path);
    //具体方向可根据需求修改
    CGPoint startPoint = CGPointMake(CGRectGetMidX(pathRect), CGRectGetMinY(pathRect));
    CGPoint endPoint = CGPointMake(CGRectGetMidX(pathRect), CGRectGetMaxY(pathRect));
    CGContextSaveGState(context);
    CGContextAddPath(context, path);
    CGContextClip(context);
    CGContextDrawLinearGradient(context, gradient, startPoint, endPoint, 0);
    CGContextRestoreGState(context);
    CGGradientRelease(gradient);
    CGColorSpaceRelease(colorSpace);
}
注意
- 当view未设置背景颜色时,重绘区域的背景颜色默认为‘黑’;
- 设置画笔颜色的方法CGContextSetRGBStrokeColor,设置填充颜色的方法CGContextSetFillColorWithColor;
- 每次绘制独立的图形结束时,都要实时调用CGContextDrawPath方法来将这个独立的图形绘制出来,否则多次CGContextMoveToPoint会使绘制的图形乱掉;
- 区别CGContextAddArc与CGContextAddArcToPoint;
- 画虚线时,之后所有的线条均变成虚线(除非再手动设置成是实现)
# 四. CAShapeLayer绘图与drawRect重绘的比较
在网上查了一些 CAShapeLayer 与 drawRect 重绘的一些比较,整理如下,有助于我们学习与区分:
- 两种自定义控件样式的方法各有优缺点,CAShapeLayer 配合贝赛尔曲线使用时,绘图形状更灵活,而 drawRect 只是一个方法而已,在其中更适合绘制大量有规律的通用的图形;
- CALayer 的属性变化默认会有动画,drawRect 绘图没有动画;
- CALayer 绘制图形是实时的,drawRect 多次重绘需要手动调用 setNeedsLayout;
- 性能方面,CAShapeLayer 使用了硬件加速,绘制同一图形会比用 Core Graphics 快很多,CAShapeLayer 属于 CoreAnimation 框架,动画渲染直接提交给手机 GPU,不消耗内,而 Core Graphics 会消耗大量的 CPU 资源。
← 内购流程以及要注意的地方 金额跳动动画效果 →